
I have been longtime user of Pidgin and liked it very much. But recenlty I was having problem with it. It was frequently breaking up the connections and dropping my messages. So, I had to look for alternatives and found instantbird and gave it try. It multimessenger client so you can be online in multiple platform (facebook, twitter, yahoo, gmail, msn etc). So here is basic guide on how to get it install it and get a launcher for it.
My instantbird launcher Sticked to Docky, looks like :

This article requires that you are little bit familiar with Ubuntu Terminals.
– To start Terminal
* you goto dashboard and then type “Terminal” and hit enter or
* Hit Super key and then type “Terminal” and hit enter.
Step 1.
Download the instant bird from http://instantbird.com/, click in “Get Instantbird – Free”
Step 2.
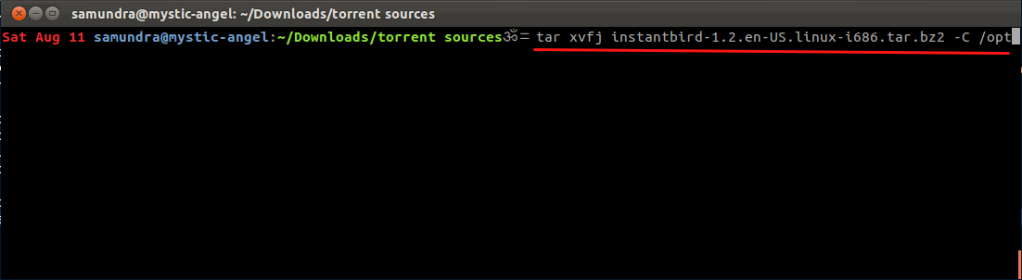
From Terminal Goto the folder where you downloaded it and then extract it to /opt/ folder. I have downloaded it in my “/home/samundra/Downloads/torrent sources”, so I use the following commands. Using sudo requires you to type your password.
[sourcecode language=’bash’]$ cd ~/Downloads/torrent\ sources/
$ sudo tar instantbird-1.2.en-US.linux-i686.tar.bz2 xvfj -C /opt[/sourcecode]
see screenshot below:
Step 3.
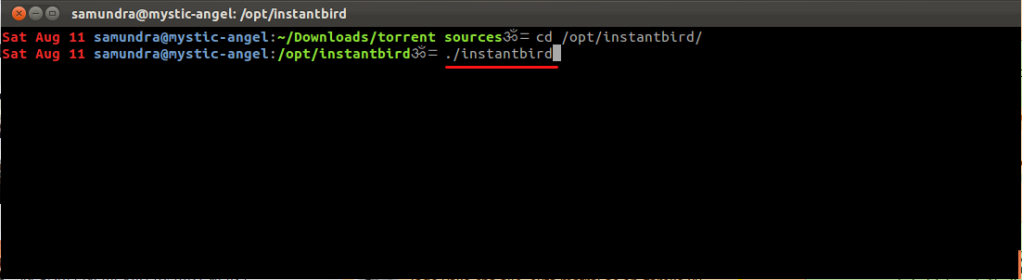
After the extractation is complete. From Terminal. Goto the /opt/instantbird/ folder then type “./instantbird” without quotes.
This is the basic installation of instantbird. After running instantbird, if you are using docky you might notice that it doesn’t have a default icon in docky. Also it can’t be pinned to docky and unity. So, to stick instantbird to unity and docky we’ll have to create our own launcher, which is very easy.
Create Launcher for Instantbird in Unity and Docky
At first create a file instantbird.desktop in desktop. I generally use terminal for these kind of tasks.
From terminal.
CD to the desktop
[sourcecode language=’bash’]$ cd ~/Desktop[/sourcecode]
Create instantbird.desktop file
[sourcecode language=’bash’]$ touch instantbird.desktop[/sourcecode]
Open instantbird.desktop file to edit.
[sourcecode language=’bash’]$ gedit instantbird.desktop &[/sourcecode]
When instantbird.desktop file is opened in gedit, copy and paste the following contents
[Desktop Entry]
Version=1
Name=Instant Bird
Comment=Instant Bird IM Client
Exec=/opt/instantbird/./instantbird
Icon=/opt/instantbird/icons/mozicon128.png
Terminal=false
Type=Application
Encoding=UTF-8
Categories=Utility;Application;
And then save it. Quit from gedit. File > Quit.
Now, Again from terminal, we will copy this file to “/usr/share/applications/” this is the location which globally provides the icons and desktop launcher settings for most applications installed. In our case instantbird.
use this command, to copy instantbird.desktop to /usr/share/applications/
[sourcecode language=’bash’]$ sudo cp ~/Desktop/instantbird.desktop /usr/share/applications/instantbird.desktop[/sourcecode]
Then give executable permission to both files one in desktop and then another in /usr/share/applications
[sourcecode language=’bash’]$ chmod u+x ~/Desktop/instantbird.desktop[/sourcecode]
Any changes in /usr/share/applications requires super user privileges, so need to put sudo before the command and then supply your root password.
[sourcecode language=’bash’]$ sudo chmod u+x /usr/share/applications/instantbird.desktop[/sourcecode]
Now we are ready to run the instantbird with desktop launcher. Run instantbird from launcher, Now instantbird should show up in unity and docky and you are able to stick it to docky and unity launcher.
I have tried to become as more clear as possible. Still if you find anything confusing please ask them in comments.
For references on unity desktop launchers, you can follow this good article https://help.ubuntu.com/community/UnityLaunchersAndDesktopFiles
Have funs.