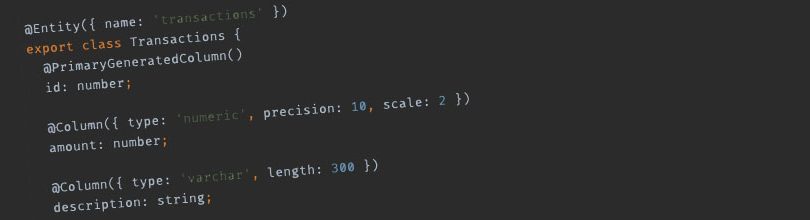
[How to] General Introduction and Installation of Limesurvey

If you don’t know what limesurvey is?
- Limesurvey is a great opensource survey application. It has been widely used by many big industries to create the survey tasks. It has many powerful features like creating dynamic fields for survey. Supports multilingual, defines userroles, user groups and the more it has been integrated into various CMS (drupal etc). The limesurvey team provides the commercial for those who are seeking.As well as community support for its users. Just to get the more details inside the limesurvey visit the http://www.limesurvey.org/

So, Here is basic guide on installing limesurvey.

At first download the limesurvey from http://www.limesurvey.org/en/download
Then click in the button where it says “Click here to download the latest version” (see the screenshot below)

Download latest limesurvey

When you click the link you get to a new page. From the new page click the file “limesurvey192-build120303.zip” or whichever link you think is suitable for you. I assume you know what these different files mean.

When the download is complete, extract the compressed file. You will get a new folder limesurvey. Copy this folder to the root of your document root or simply saying ‘htdocs’.

Now, here is the main configuration part for limesurvey.
- Open the limesurvey/config.php

and replace the following lines with appropriate settings

$databaselocation   =   'localhost';
$databasename       =   'limesurvey';
$databaseuser       =   'root';
$databasepass       =   '';
$dbprefix           =   'lime_';

$rooturl            =   "http://{$_SERVER['HTTP_HOST']}/ls";

// Installation Setup
$defaultuser        =   'admin';           // This is the username when LimeSurvey is installed and the administration user is created on installation
$defaultpass        =   'password';

In the above url, if your limesurvey folder is different than “limesurvey” as in my case it is “ls” then you also have to reflect that changes in $rooturl variable. To do that simply replace the name folder at the end of the $rooturl variable with newer one. see the line 7 in above code.

Then There is the installation setup which is admin username and password that will be used to login into the limesurvey admin page.

Now, Create a database named “limesurvey” or whichever you put into the config.php settings.

We are done with the settings. Now, we will have to populate the database with intial settings for limesurvey to operate. To do that visit the link

http://localhost/limesurvey/admin/install/

You’ll get a message as “A database named ‘limesurvey’ already exists. Do you want to populate that database now by creating the necessary tables.”.

It is fine we did that on purpose,right. This database is empty and now we will populate with necessary limesurvey tables.

see the screenshot below
Populate database

To do that, Just click in the “populate database”. This will take a moment.

When everything goes fine you will get a message as “Database `limesurvey` has been successfully populated.” as shown in screenshot below :

Successfull population of limesurvey database

Now if you click on the button “Main admin screen” you will get a error message stating that either you should delete or rename the install folder.

Rename install folder
Delete or rename the install folder. In Development environment, I usually rename the install folder.

  • -goto the limesurvey/admin folder
  • rename the “install” folder to the “old.install”

Now, we are done with limesurvey installation and it is ready for creating surveys.

To start the limesurvey administration visit the url http://localhost/limesurvey/admin/

Login to the limesurvey
To login to the limesurvey, use the username/password configured inside “config.php”.

I have tried to be as smooth as possible with the installation and forgive my English, i know its quite up and down. So that was all and if you are looking for more limesurvey tutorials drop some comments and I will try to be helpful as much as possible.

References :
1. Limesurvey Homepage, http://www.limesurvey.org/
2. Limesurvey Developer’s Wiki, http://docs.limesurvey.org/tiki-index.php?page=LimeSurvey%20Development&redirectpage=Development

How to install TweetDeck in Natty Narwhal (Ubuntu11.04)

Tweetdeck requires to have adobe air pre-installed.

Visit my previous article http://www.samundra.com.np/how-to-install-tweetdeck-in-natty-narwhal-ubuntu-11-04/553 To install Adobe Air

If you have already installed Adobe Air, You can skip the above step 1.

At first visit the website : http://www.tweetdeck.com/desktop/

There you’ll see a Download Button at the bottom right corner. (see the screenshot below).

Download now - tweetdeck

Click “Download now” button,

After, you click the button changes to “installing TweetDeck” (see the screenshot below), it should get you a setup file.
Installing TweetDeck - tweetdeck

Just click on open to run the setup file(screenshot below)
Open or Save TweetDeck - tweetdeck

Note : You can also click on save and execute it later to actually install the Tweet Deck Application.

That’s all, Now you should have TweetDeck installed in your Ubuntu box, if you have exactly followed the steps above.

Hope you liked the article.

Happy Tweeting :D

How to install Adobe Air in Natty Narwhal (Ubuntu 11.04)

To install TweetDeck first we need to install the Adobe Air

To install adobe air visit the following site.

  1. http://get.adobe.com/air/

From The Selection Combo Box select .deb (see the screenshot below – step1.png)

Adobe Air Installations

Adobe Air Installations

After that you will get a Download now button Click on that button.

Then you will have a installer file adobeair.deb

Double click or Right-click on this adobeair.deb file and open with ubuntu software center, install the application. (See the screenshot below – open_with_ubuntu_software_center.png )

Open with Ubuntu Software Center

Open with Ubuntu Software Center

During installation, you may be asked to confirm the installation telling that the source is untrusted because it doesn’t have standard maintainer or something like that. Just ignore it and hit the Yes Button. What all it means is that in future we won’t be able to update it directly as other packages in Ubuntu but we’ll need to upgrade it ourselves in case new packages arrive in the market :D

After you successfully Install the adobe air, Its time to actually install the TweetDeck.

For next part Visit my post How to Install TweetDeck in Natty Narwhal (Ubuntu11.04)

[Solved] Phpmyadmin Vs commandline mysql import

Phpmyadmin allows GUI interface to import but it also depends on the browser because it runs on localhost, that is webserver so when importing huge amount of data the GUI of phpmyadmin seems to freeze, that browser stops responding.

  • If the file is of small size say around 10-20 MB it wouldn’t make any difference but if the file is of huge i.e. around 100+ MB, at that time it makes difference

As a solutions, we can increase the filesize import limit and execution time limit through php.ini.

And the other solution would be to use the mysql command line to import that is very efficient compared to the GUI for import i.e. in phpmyadmin.

The command is

$ mysql -u root -p -h localhost -D "databasename" < import.sql

Then you’ll be asked for password of mysql, supply your mysql password and wait for few seconds/minutes. The amount of time one has to wait depends on the amount of data which is being dumped. The higher the amount of data means higher the waiting time.

When your data has been successfully dumped you will get a command prompt, without any error messages, which means the data has been successfully dumped.

Above command works for both Windows as well as Linux. I have tried importing the 150 MB of file and it took me around 10 sec.

Hope this helps someone.